Category: iOS

Saving Data When Your Swift App Quits

A common scenario for iOS and Mac apps is to save data when someone quits the app. You have written a function to save the data. Where do you make the call when the app quits? This article answers that question, both for the SwiftUI app life cycle and the classic AppDelegate life cycle.

Using the SwiftUI App Life Cycle

In Xcode 12 Apple introduced a native SwiftUI app life cycle. The new life cycle has a scenePhase environment value that stores the app’s current phase, such as active, inactive, or background.

Add a property to the app struct for the scene phase. Add the .onChange modifier to the app’s window group or document group. Check if the phase is .background. If it is, make a call to save the data. The following code shows how to check when the app goes in the background:

Using the AppDelegate Life Cycle

If your Xcode project has a file named AppDelegate.swift, it is using the AppDelegate life cycle. Open the AppDelegate.swift function, and you should see multiple empty functions for handling app events.

An iOS app that wants to save when someone quits the app should make a call to save the data in the function applicationDidEnterBackground. This function is called when the person quits your app.

A Mac app should make the save call in applicationWillTerminate.

Where are the Single View and Master-Detail App Project Templates?

Prior to Xcode 12 Xcode had the following iOS application project templates:

  • Single View App
  • Master-Detail App
  • Page-Based App
  • Tabbed App

If you create an iOS application project in Xcode 12, you will notice these project templates are missing. In Xcode 12 Apple consolidated these project templates into one template: App. If you are following a tutorial that tells you to choose one of the older templates that no longer exist, choose the App template.

Using Environment Variables in Swift Apps

When to Use Environment Variables

Most Swift apps do not need environment variables. A common reason to use environment variables is for apps that call a website’s REST APIs. To gain access to someone’s account on the website, your Swift app uses a client ID and client secret from the website. Storing the client ID and client secret in environment variables is safer than storing them as strings in your code.

Suppose you are developing a git client app. Your app wants to push commits to GitHub. To push commits to GitHub you must create an OAuth app for your app in GitHub. The GitHub OAuth app contains a client ID and a client secret that your Swift app uses to authenticate the user so your Swift app can access the person’s GitHub account. GitHub recommends using environment variables to store the client ID and client secret.

Add the Environment Variables from Xcode’s Scheme Editor

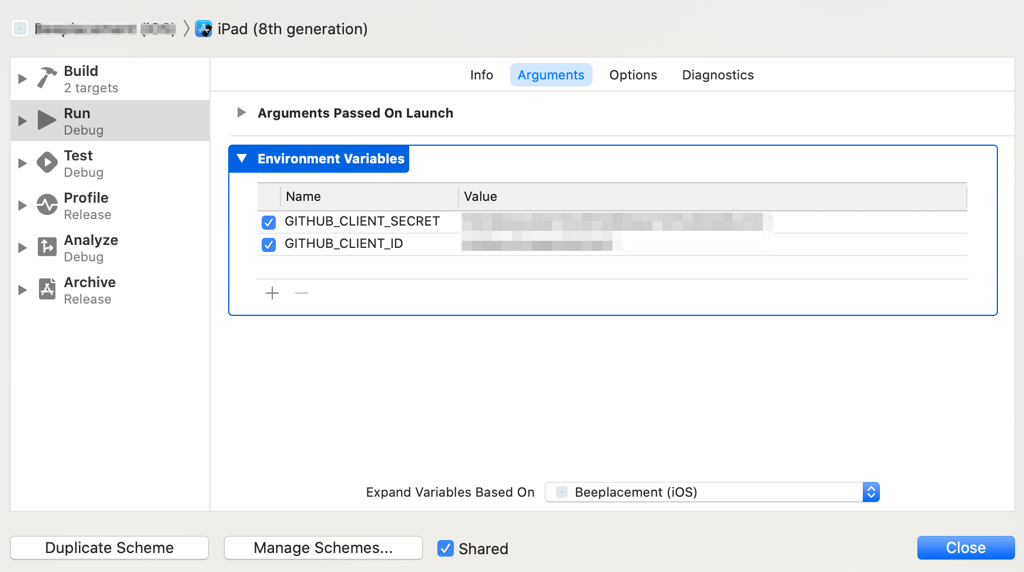
The first step to using environment variables is to add them to your Xcode project. Use Xcode’s scheme editor to add environment variables to your app. Use the jump bar next to the Run and Stop buttons in the project window toolbar to open the scheme editor.

XcodeSetEnvironmentVariablesBlurred

Select the Run step on the left side of the scheme editor. Click the Arguments button at the top of the scheme editor to access the environment variables. Use the Add (+) button to add the environment variables.

Accessing Environment Variables in Your Swift Code

After adding environment variables, you can access them in your code. Use the ProcessInfo class to access environment variables. The class has a processInfo property that contains a dictionary of values. The name of the environment variable is a key in the dictionary. Use that key to get the environment variable’s value. The following code demonstrates how to access a variable containing a GitHub OAuth app’s client ID:

Should I learn Swift or SwiftUI?

I see a lot of new iOS developers ask the question in the title of this article. The short answer is both. To write SwiftUI apps you must also learn Swift because Swift is the programming language SwiftUI uses. The rest of this article provides a more detailed explanation.

UIKit

In 2008 Apple gave developers a SDK (Software Development Kit) to let them make native iOS apps. The heart of the SDK was UIKit, a framework for creating the views and controls in iOS apps, such as buttons, text fields, and table views.

UIKit uses the Objective-C programming language. Using Objective-C worked well for existing Mac developers, who were already using Objective-C to make Mac apps. But the release of the iOS SDK attracted lots of new developers to the Apple developer community. These new developers found Objective-C’s syntax to look strange and found it difficult to understand. They wanted a language with a syntax that looked more familiar.

Swift

In 2014 Apple unveiled their solution for developers who hated Objective-C: the Swift programming language. Swift’s syntax looked more familiar to people who came to iOS development from web development and Windows development. Now iOS developers had two language choices for making iOS apps with UIKit: Swift and Objective-C.

SwiftUI

In 2019 Apple released the initial version of SwiftUI, a new framework for developing apps for all of Apple platforms: iOS, Mac, tvOS, and watchOS. SwiftUI has only one language: Swift. You must know Swift to use SwiftUI.

The Language and Framework Options for iOS Apps

Someone who wants to make iOS apps with Apple’s frameworks has three options.

  1. Use UIKit with Objective-C.
  2. Use UIKit with Swift.
  3. Use SwiftUI with Swift.

Which option should use choose? You won’t be making a mistake no matter which option you choose. But for someone new to iOS development, I recommend Option 3, write the app with SwiftUI using Swift. SwiftUI is the future of iOS development. You’re eventually going to have to learn it so you might as well learn it now.

Make a Markdown Editor in SwiftUI

In this tutorial you will make a Markdown editor with live preview using SwiftUI. This editor will run on both iOS and Mac. It’s a nice example to demonstrate how to create a document-based, multi-platform SwiftUI app. Plus, it shows how to use a WebKit web view in SwiftUI.

This tutorial uses the new document-based app features Apple added in Xcode 12. You must be running Xcode 12.2+ to create a multi-platform SwiftUI app. The iOS app requires iOS 14+, and the Mac app requires macOS 11+. If you are running macOS 10.15 (Catalina) on your Mac, you can still make the editor. You won’t be able to run the Mac version.

To keep the tutorial from getting too long, I will gloss over some steps and explanations that I covered in the following articles:

Create the Project

Start by creating the project.

  1. Choose File > New > Project in Xcode.
  2. Click the Multiplatform button at the top of the New Project Assistant.
  3. Choose Document App from the list of application templates.
  4. Click the Next button.
  5. Name the project in the Product Name text field.
  6. Click the Next button.
  7. Choose a location to save the project.
  8. Click the Create button.

If you look at the project navigator, you will see Xcode creates the following folders for your project:

  • The Shared folder contains files that both the iOS and Mac app targets use.
  • The iOS folder contains files that the iOS app uses.
  • The Mac folder contains files that the Mac app uses.

In the Shared folder are Swift files for the app, document, and content view.

Run the project and you will see that you have a working plain text editor. You can create documents, edit text, save documents, and load documents.

Add the Ink Package

This project uses the Ink Markdown parser to convert the Markdown you type in the text editor to HTML that you will preview. Ink has Swift Package Manager support to simplify adding it to your Xcode project.

Select the name of your project from the project navigator to open the project editor. Select the project from the project editor and click the Swift Packages button at the top of the editor to add the Ink package.

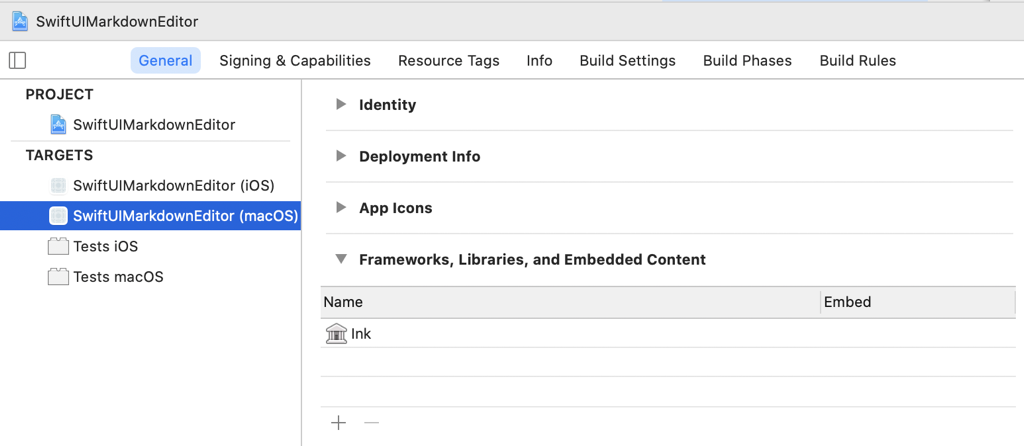
A current limitation in Xcode’s Swift Package Manager support is you can add a package to only one target initially. To add Ink to the other app target, select the target from the project editor and add the Ink framework from the Frameworks, Libraries, and Embedded Content section.

AddSwiftPackageToSecondTarget

Add Web Views

To preview the Markdown you write, you need a web view to display the HTML. SwiftUI does not currently have a native web view so you must use a WebKit web view, WKWebView, for the preview.

WKWebView has both iOS and Mac support, but you’re going to have to create two web view files: one for the iOS app and one for the Mac app. The code is going to be almost identical. The reason you need two files is that SwiftUI has separate protocols for working with UIKit(iOS) and AppKit(Mac) views.

Create one new Swift file in the iOS folder in the project navigator and create a second file in the Mac folder. Make sure the file in the iOS folder is a member of the iOS app target. Make sure the file in the Mac folder is a member of the Mac app target. You can set the target membership for a file using the File Inspector on the right side of the project window.

Add the following code to the iOS Swift file:

The web view uses the SwiftUI and WebKit frameworks so you must import them. When you use a UIKit view in a SwiftUI app, the view must conform to the UIViewRepresentable protocol. The html property stores the HTML to display in the web view.

There are three functions. The init function initializes the web view with some HTML to display. The makeUIView function creates the web view. The updateUIView function loads the HTML string to show in the web view.

The Mac code is almost identical. Replace anything starting with UI with NS.

Parsing the Markdown

The next step is to write some code to parse the Markdown to HTML. Open the ContentView.swift file. Import the Ink framework.

Add the following computed property to the ContentView struct:

This code creates an Ink parser and calls a function that converts the document text into HTML. This code is much easier to write than creating your own Markdown parser.

Build the User Interface

The last step is to build the user interface. The user interface contains a text editor and a web view side by side.

The body property for the content view should look like the following code:

The code creates a horizontal stack so the text editor and web view are side by side. The text editor is on the left and contains the document’s text. The web view is on the right and displays the HTML you parsed from the Markdown text. The iOS app uses the iOS version of the web view. The Mac app uses the Mac version of the web view.

Run the project. Any Markdown you type in the text editor will appear as HTML in the web view. The Ink parser does not currently support creating code blocks with indentation. You must add three backticks on the line above and below the code to create a code block.

I have the project on GitHub for you to look at if you run into problems.

Saving Data in a Swift App

People new to iOS development frequently ask how to save data in their apps. Apple provides the following technologies for saving app data on a local device:

  • UserDefaults
  • Keychain
  • Files
  • Core Data

You can use multiple methods to save data in your app. Many iOS and Mac apps use both UserDefaults and Core Data to save data. Use all the methods for saving data that make sense for your app.

UserDefaults

Apple provides a UserDefaults class that provides a programming interface to your app’s defaults database. The defaults database contains user settings and preferences.

Use UserDefaults to store small amounts of data, like settings and preferences. If you are writing a plain text editor, you could store the font to use in UserDefaults.

Keychain

Use the keychain to store small amounts of data securely, such as passwords. If you were writing a Twitter app, you could use the keychain to store the person’s Twitter handle and password.

Apple provides a Keychain Services API for apps to work with the keychain. The documentation is in the System > Security section of Apple’s documentation in Xcode. Choose Help > Developer Documentation in Xcode to read the documentation.

The following article provides an introduction on working with the keychain:

Saving Passwords in the Keychain in Swift

Files

You can use files to store larger amounts of data. Document-based apps, such as text editors, spreadsheets, and drawing apps, usually save their data in files.

Apple provides the Codable protocol to simplify reading and writing data to files. An Internet search for Swift Codable tutorial yields many results, most of which cover JSON.

Core Data

Core Data is Apple’s framework for creating and working with a data model for iOS and Mac apps. One of the things Core Data does is save data for you.

Core Data is a huge subject. People have written books about it. You can find an overview of Core Data in Apple’s documentation in Xcode under App Services. Apple also has a Core Data Programming Guide on their developer website.

Core Data or Files?

Should you use Core Data or files to save larger amounts of data?

Core Data is a powerful framework that does a lot, much more than saving app data. But with that power comes a learning curve.

You must determine if your app’s data needs require Core Data. Avoid Core Data (or at least do some more research before using Core Data) in the following cases:

  • Your app supports non-Apple platforms like Android, Linux, and Windows. Core Data does not run on non-Apple platforms.
  • Your data can easily be saved in one file.
  • Your app data has only one class or struct.
  • You are writing a document-based app. Core Data supports document-based apps, but it doesn’t add much to Apple’s document architecture.

A text editor is an example of a project where you should save your data in a file. The app data is just a bunch of text. The data can easily be saved in one file. Core Data would not help you much.

Use Core Data to save your app’s data in the following cases:

  • You store large amounts of data in the app.
  • The data makes more sense to store in a database than in a single file.
  • Your app data has multiple classes or structs.
  • You are writing a shoebox (not document-based) app.

A blog editor is an example of a project where you should use Core Data. A blog can contain hundreds of posts that would be difficult to store in a file. A blog has multiple pieces of data: titles, tags, categories, and authors. Core Data can do things like show you all the blog posts with a given tag. Take advantage of Core Data if it will help for your app.

If you are still not sure whether or not to use Core Data, use it.

Scrolling an iOS Text View When the Keyboard Appears

A common issue iOS developers run into is dealing with the onscreen keyboard. The keyboard appears and blocks what you’re typing.

The fix is to scroll the text view when the keyboard appears. The code to do this is not too hard. iOS posts a notification when the keyboard appears and when the keyboard disappears. Write a function to handle each notification. Scroll the text view when the keyboard appears and return it to its original position when the keyboard disappears.

Handling the Keyboard Appearing Notification

You must write the function keyboardWasShown. This function gets called when the keyboard appears.

There are two things to do in keyboardWasShown to scroll the text view. First, set the text view’s content inset so the bottom edge is the keyboard’s height. Second, set the scroll indicator insets to the text view’s content inset.

Swift functions that work with notifications require the @objc keyword at the start of the function declaration. The userInfo property of the notification contains the rectangle where the keyboard appears on the screen.

Use the keyboard rectangle to get the keyboard’s height. Set the text view’s bottom edge inset to the keyboard’s height. The text view will scroll when the text insertion point gets near the top of the keyboard.

Handling the Keyboard Hiding Notification

You must write the function keyboardWillBeHidden. This function gets called when the person entering text hides the keyboard.

When the keyboard disappears, set the text view’s content inset back to all zeroes. Set the text view’s scroll indicator insets to the text view’s content inset.

Example Project

I have a text editor project on GitHub to see the keyboard handling code in practice.

It’s OK to Use Storyboards

A common question new iOS developers ask is how to build their app’s user interface: code or storyboards. People adamant about building their interfaces in code inevitably join in to say that building interfaces in code is the right way, the way big companies make iOS apps. But it’s OK to use storyboards for your user interface, especially if you are new to iOS development.

What’s Wrong with Storyboards?

Storyboards have two main issues. The first issue involves version control. If multiple people make changes to a storyboard, commit the changes, and merge the changes, conflicts occur that are difficult to resolve.

Merge conflicts are a serious issue, but if you’re a new iOS developer, you probably are working alone. You’re the only one editing the storyboard so you don’t have to worry about merge conflicts.

The second issue with storyboards is that editing them can be slow if you jam 10 or more screens into a single storyboard. If you run into this issue, the solution is to use multiple storyboards. Select the view controller scenes you want to put in a new storyboard and choose Edit > Refactor to Storyboard.

Why Use Storyboards?

The point of this article isn’t to show that storyboards are better than code for building user interfaces, but the following list shows some reasons to use storyboards:

  • UIKit is meant to work with storyboards. Xcode projects that use UIKit include a storyboard for a reason.
  • Using storyboards is easier for new iOS developers than building a user interface entirely in code. Dragging a button or other control to a screen is easier than figuring out the code you have to write to create and place that control.
  • Storyboards let you see how your interface looks before running the app. With code you have to build and run the project to see how the interface looks.

Conclusion

Build your user interface however you want. But it’s OK to use storyboards. You’re not doing it wrong if you use a storyboard for your app’s user interface, no matter what someone on Reddit or Slack tells you.

Creating Document-Based Apps with SwiftUI

Xcode 12 Note from the Author

Xcode 12 made a bunch of changes to SwiftUI for document-based apps. If you choose a multi-platform document app project, you will get the text editor project I create in this article without having to write any code. I’m keeping this article up for people who are still using Xcode 11.

The article Make a Markdown Editor in SwiftUI shows how to create a document-based SwiftUI app with Xcode 12.

Start of Original Article

I have not seen any articles or tutorials on creating a document-based app with SwiftUI so I’m writing one. In this tutorial you will build an iOS plain text editor.

If you haven’t already, I recommend reading two articles before going through the tutorial. Creating Document-Based iOS Apps Part 1 provides an overview of creating document-based iOS apps. Using Text Views in a SwiftUI App provides an explanation of using a UIKit text view in a SwiftUI app. SwiftUI does not currently have a built-in text view.

Create the Project

Start by creating a project. Create an iOS document-based app project. Choose SwiftUI from the User Interface menu if it’s not already selected.

The most interesting files Xcode creates for a document-based SwiftUI app are the following:

  • DocumentBrowserViewController.swift contains code for the document browser, where people create and open documents.
  • DocumentView.Swift contains code for the document’s main view.
  • Document.Swift contains code for the document.

Creating a New Document

If you run the project, you’ll notice that tapping the Create Document button does nothing. You must write some code to create the document when someone taps the button. The easiest way to create a new document is to add an empty file to the project. The empty file should have the same file extension as the document’s. This file will be copied to the app bundle when building the project. You’ll have to write some code to load the file from the app bundle.

One last thing to do to create documents properly is to configure the document type in Xcode so that the app is an editor of plain text files.

Add an Empty Document File

Choose File > New > File to add a new file to the project. Select Empty from the list of iOS file templates. The empty file is in the Other section. You have to scroll down a bit to reach the Other section.

Name the file. I named the file New Document.txt. You can choose a different name, but remember the name.

Load the Empty Document

Open the DocumentBrowserViewController.swift file and go to the didRequestDocumentCreationWithHandler function. Replace the following line of code:

With the following code:

This code loads the empty document file from the app bundle and uses that as the base for a new document.

There is one more piece of code to change. In the same function, find the following code:

There is a problem with the code inside the if block.

This line of code moves the file from the application bundle. Your app will crash the second time you create a document because the empty document file was moved out of the application bundle. The fix is to copy the file from the application bundle when creating a new document.

Edit the Document Type

Xcode initially sets the document type for an iOS document-based app to be a viewer of image files. You must configure the document type in Xcode so that the app is an editor of plain text files. You’re making a text editor, not a text viewer.

Select the project from the project navigator to open the project editor. Select the app target from the left side of the project editor. Click the Info button at the top of the project editor to access the document types. Click the disclosure triangle next to Document Types.

DocumentTypes

  1. Enter PlainText in the Name text field.
  2. Enter public.plain-text in the Types text field. public.plain-text is the UTI (Uniform Type Identifier) for plain text files.
  3. In the Additional document type properties section, set the CFBundleTypeRole value to Editor so people can edit documents.
  4. Set the LSHandlerRank value to Alternate to ensure this text editor isn’t the default text editor for all plain text files.

Create the Data Model

The data model for this project is simple. The document is the data model. All you have to do is add a property to store the text. Open the Document.swift file and add the following code inside the Document class:

The code declares a property to store the text and has the initial value of an empty string.

Building the Text View

Now it’s time to add the text view so people can edit text. Currently SwiftUI does not include a text view so you have to write code to create a UIKit text view. But it’s not too much code. Add a new Swift file to your project for the text view. Import the SwiftUI and UIKit frameworks. Add the following struct:

The text view must conform to the UIViewRepresentable protocol, which is the protocol that allows the use of UIKit views in SwiftUI apps. To conform to the protocol, you must write the following functions:

  • makeUIView
  • updateUIView
  • makeCoordinator

The makeUIView function creates and configures the view. The function takes an argument of type Context and returns the type of view you want to make, which is UITextView for a text view. The Context type is a type alias for the context where updates to the UIKit view take place.

The code listing creates a text view, configures the view so people can edit large amounts of text, and adds some padding so the text isn’t on the left edge of the screen. The code also sets the view’s delegate to the context’s coordinator, which you will create shortly.

The updateUIView function handles updates to the view.

I will fill in this function later.

The makeCoordinator function creates a coordinator so the UIKit view can communicate with data in SwiftUI.

Create the Coordinator

Add a Coordinator class inside the struct for the text view.

The class inherits from NSObject, which is the base class for all UIKit classes. A text view’s coordinator should conform to the UITextViewDelegate protocol so it can respond to text view notifications, such as the text changing.

The coordinator needs a property to hold the UIKit view and an initializer. I will be adding more to the coordinator later in the article.

Add the Text View to the Document View

The last step to adding the text view is to have the document view display it. Open the DocumentView.Swift file. Inside the body property you should see a VStack that contains a HStack and a button. The HStack shows the name of the file. The button lets you go back to the browser when you’re done writing.

The text view should appear between the HStack and button. Add the following line of code between the HStack and button:

If you build and run the project, you should be able to create a new document and type in it.

Connect the Text View to the Document

For the app to do more than let people type text in a text view, you must connect the text view to the document so the text you type updates the document as well. In the document view, you should see the following variable:

This variable contains a reference to the document. Make the following changes to the variable:

The @State property wrapper will allow the text view to bind to the document in order to display the document’s text. Changing the type of the variable to Document is also necessary for the text view to work with the document properly.

Now add the following property to the text view:

The @Binding property wrapper binds the document property in the text view to the document property in the document view. The text view and document view are both pointing to the same document. The text view now has access to the document.

Now that you created the binding you must go back to the document view and change the call to create the text view by supplying the document as an argument.

The $ at the start of $document indicates that you are passing a binding to the text view. You must pass a binding so the document view and text view both point to the same document.

Fill the updateUIView Function

Now that the text view has access to the document, you can write the text view’s updateUIView function. Set the text view’s contents to the document’s contents.

Handling Text Changes

One last thing to do is to update the document when the text view contents change. Add the following function to the Coordinator class:

The first line of code sets the document’s contents to the text view’s contents. The second line marks the document as changed so it will be saved.

Save the Document

At this point you’re finished with the SwiftUI material, but there’s still some work to do to finish the app. The text editor is missing one really big feature: saving text. Open the Document.Swift file. Xcode created a blank contents function for saving the document.

What you have to do is convert the text in the document to a Data object and archive that object. Apple provides the NSKeyedArchiver class and an archivedData function so you can do both steps in one line of code.

The root object is the document’s text. Requiring secure coding ensures your app will be able to unarchive the data when loading the document.

Load the Document

After saving the document, the next task is to load the document when someone chooses a document from the browser. Xcode supplies a blank load function, where you write the code to load the document from disk.

The first argument to the load function is the contents of the file. You must first cast the contents to the Data type. Call the NSKeyedUnarchiver class’s unarchiveTopLevelObjectWithData function to unarchive the text from the file. The last step is to set the document’s text to the contents of the file.

Conclusion

Now you have a simple, working text editor. You can create documents, edit text, save documents, and open them. You can use this project as a foundation for building your own text editing app, such as a Markdown editor. I have the project on GitHub for you to download if you run into issues.